Hello everyone,
In last article we have seen how to characterize MakeHuman characters in Maya so we can use it for animations. In this post, we will see how to animate those character in unity. Here we will see how to apply animations to our character. So lets start with it.
Step 1:Character Model Setup and Export from MakeHuman
Design the character in MakeHuman as per your requirements. Once you are done with the designing make sure to do below checks.
a) Bring the Character in "T-Pose".
Below image shows how and where in MakeHuman character in T-Pose. This pose is necessary so as to map all bones to unity mecanim.
b) Set the skeleton type as "Game Engine"
Below image shows where to change the skeleton type of our character. Here we will select Game Engine as our Skeleton Type as it have optimized sets of bones necessary to get the character animated.
After completion with above steps , you can export the character directly to your Unity Project folder, make sure the character model is exported in FilmBox (FBX) file format. Below image shows to export the character in FBX file format.
Step 2: Import the Model in Unity3D
Once our character model is exported from MakeHuman, unity will auto import the model from MakeHuman.
In case, the materials did not import properly and the model appeared as grayed out, you can fix the material issue by selecting material naming as "From Model's Material" and Material search as "Local Materials Folder".
Set the rig animation format of the character model as "Humanoid" as shown in image below-
After selecting the Humanoid, click on configure button, below screen will show up-
Click on Done, if all the bones are properly configured, you can also test all the muscle settings to check if the model is perfectly rigged and ready for animation.
Step 3: Create animation controller.
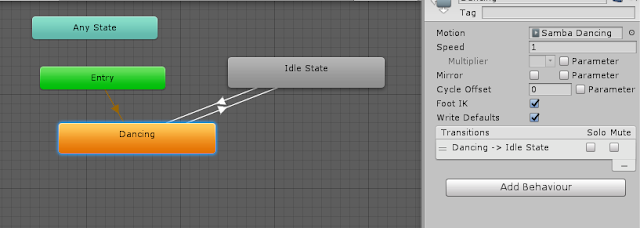
In unity, with animation controllers you can setup a game object or character to perform a set of animations in defined sequence, you can also define transitions from one animation to another using animation controllers in unity, below images show how you can create an animation controller, the configuration of transition of animation "dancing" to "idle" state.
Right click on selected folder and select animation controller as shown in above figure.
Setup the animation sequences, you can download the animation files(like samba dancing) from Mixamo.
Step 3: Configure your MakeHuman character with animation controller.
As most of the work is been covered in above two steps, this is one simple step in which you just have to drag your character in your scene and configure the new animation controller to that character. Below image shows the same.
After the above step is done, click on play button and your can that your character is dancing like a "Pro" dancer.
Visit this link for Affordable website hosting.-
In last article we have seen how to characterize MakeHuman characters in Maya so we can use it for animations. In this post, we will see how to animate those character in unity. Here we will see how to apply animations to our character. So lets start with it.
Step 1:Character Model Setup and Export from MakeHuman
Design the character in MakeHuman as per your requirements. Once you are done with the designing make sure to do below checks.
a) Bring the Character in "T-Pose".
Below image shows how and where in MakeHuman character in T-Pose. This pose is necessary so as to map all bones to unity mecanim.
 |
| T-Pose Setup |
b) Set the skeleton type as "Game Engine"
Below image shows where to change the skeleton type of our character. Here we will select Game Engine as our Skeleton Type as it have optimized sets of bones necessary to get the character animated.
 |
| "Game Engine" Skeleton Setup |
After completion with above steps , you can export the character directly to your Unity Project folder, make sure the character model is exported in FilmBox (FBX) file format. Below image shows to export the character in FBX file format.
 |
| FBX Export to Unity Assets Folder |
Step 2: Import the Model in Unity3D
Once our character model is exported from MakeHuman, unity will auto import the model from MakeHuman.
In case, the materials did not import properly and the model appeared as grayed out, you can fix the material issue by selecting material naming as "From Model's Material" and Material search as "Local Materials Folder".
Set the rig animation format of the character model as "Humanoid" as shown in image below-
After selecting the Humanoid, click on configure button, below screen will show up-
Click on Done, if all the bones are properly configured, you can also test all the muscle settings to check if the model is perfectly rigged and ready for animation.
Step 3: Create animation controller.
In unity, with animation controllers you can setup a game object or character to perform a set of animations in defined sequence, you can also define transitions from one animation to another using animation controllers in unity, below images show how you can create an animation controller, the configuration of transition of animation "dancing" to "idle" state.
 | |||
| Creating Animation Controller |
Setup the animation sequences, you can download the animation files(like samba dancing) from Mixamo.
Step 3: Configure your MakeHuman character with animation controller.
As most of the work is been covered in above two steps, this is one simple step in which you just have to drag your character in your scene and configure the new animation controller to that character. Below image shows the same.
After the above step is done, click on play button and your can that your character is dancing like a "Pro" dancer.
 |
| Character animation in "Play" Mode |
Visit this link for Affordable website hosting.-


